Introduction to Christmas Cookie Icing
The Tradition of Holiday Cookies
When it comes to holiday festivities, few traditions match the joy of baking Christmas cookies. Generations have passed down recipes that create these delightful treats, often bringing families together in the kitchen. From sugar cookies to gingerbread, each little creation becomes a canvas for creativity and expressions of love. In fact, according to the American Bakers Association, cookie baking has become a cherished activity for many during the holiday season, with families spending quality time together, reminiscing about past celebrations.
Why Icing Makes Cookies Special
What truly elevates these cookies from simple sweets to treasured memories is the icing. Always a crowd-pleaser, it transforms plain cookies into bright, festive masterpieces! Decorated cookies often tell a story, reflecting personal styles and holiday themes. Imagine a beautifully iced snowman or a shimmering Christmas tree that not only tastes amazing but also becomes a centerpiece at your gatherings. Icing also adds texture and flavor, providing a delightful crunch that complements the cookie’s softness. Plus, who doesn’t love a sprinkle of glittery edible decor? For some tips on cookie decoration, check out this helpful guide.
Overview of the Recipe
In this Christmas cookie icing recipe, you’ll discover an easy yet versatile method for creating the perfect icing with just a few simple ingredients. The best part? You can customize the colors and flavors to match your holiday spirit! Here’s a brief overview of what you’ll need and what to expect:
- Ingredients: Powdered sugar, milk, and vanilla extract form the base of your icing. You can also incorporate food coloring for a festive twist.
- Steps: Mix the ingredients until smooth, then pipe or spread the icing on cooled cookies, allowing for plenty of creative freedom in your designs.
- Uses: This icing is perfect for outlining, flooding, or simple decorations, making it suitable for any cookie style.
Whether you’re looking to impress your friends or create a wonderful holiday experience for your family, this icing recipe is sure to bring the festive spirit to your table! So, grab your apron and let’s get started on this sweet journey!
Ingredients for Christmas Cookie Icing
When you’re planning to whip up some festive Christmas cookie icing, a few essential ingredients will make all the difference.
Essential Ingredients for Cookies
To start off, you’ll need:
- Powdered sugar: This is the backbone of any icing recipe. It gives that sweet, fluffy texture we all love.
- Egg whites: Fresh egg whites offer stability and help the icing hold its shape. If you’re concerned about raw eggs, feel free to use pasteurized ones.
Ingredients for Easy Icing
For a quick and simple icing that still looks fabulous:
- Milk: Just a splash helps thin out your icing for a smooth consistency.
- Vanilla extract: A touch of this will add warmth and a delightful aroma to your icing.
Optional Ingredients for Customization
Feeling creative? Here are some optional ingredients to give your icing a personal twist:
- Food coloring: Choose vibrant shades to match your holiday theme, making your cookies extra festive.
- Flavored extracts: Almond or peppermint extracts can take your icing from basic to brilliant.
With these ingredients, you can create a stunning array of iced cookies that are perfect for gifting or enjoying with loved ones. Explore more ideas on expert baking sites like King Arthur Baking or America’s Test Kitchen for icing variations and decorating tips!
Step-by-step Preparation for Christmas Cookie Icing
The holidays are the perfect time for baking delicious cookies, and there’s nothing more festive than beautifully decorated Christmas cookies. In this guide, we’ll walk you through each step—from making the cookie dough to icing those masterpieces. Get ready to spread some holiday cheer, one cookie at a time!
Make the Cookie Dough
The foundation of any great Christmas cookie is the cookie dough. Begin by gathering your ingredients:
- 2 3/4 cups all-purpose flour
- 1 teaspoon baking powder
- 1/2 teaspoon salt
- 1 cup unsalted butter, softened
- 1 1/2 cups granulated sugar
- 1 egg
- 1 teaspoon vanilla extract
- 1/2 teaspoon almond extract
Combine the flour, baking powder, and salt in a bowl and set it aside. In another bowl, cream the softened butter and granulated sugar until light and fluffy. Incorporate the egg and extracts, mixing well. Gradually add the flour mixture until everything is combined. This dough can be quite versatile: refrigerate it if you want a firmer dough for rolling, or use it as is for a more drop cookie approach.
For more comprehensive tips on cookie-making, check out resources like King Arthur Baking.
Roll and Chill the Dough
After making your dough, it’s time to roll it out. Lightly flour your work surface and use a rolling pin to roll the dough to about 1/4 inch thickness. If the dough is too sticky, a dusting of flour will help.
- Cut out your shapes: Use your favorite cookie cutters to create festive shapes—stars, trees, and gingerbread men are all great options!
- Chill: Place the cut-out cookies on a baking sheet lined with parchment paper and chill them in the refrigerator for at least 30 minutes. This step is crucial as it helps the cookies maintain their shape during baking.
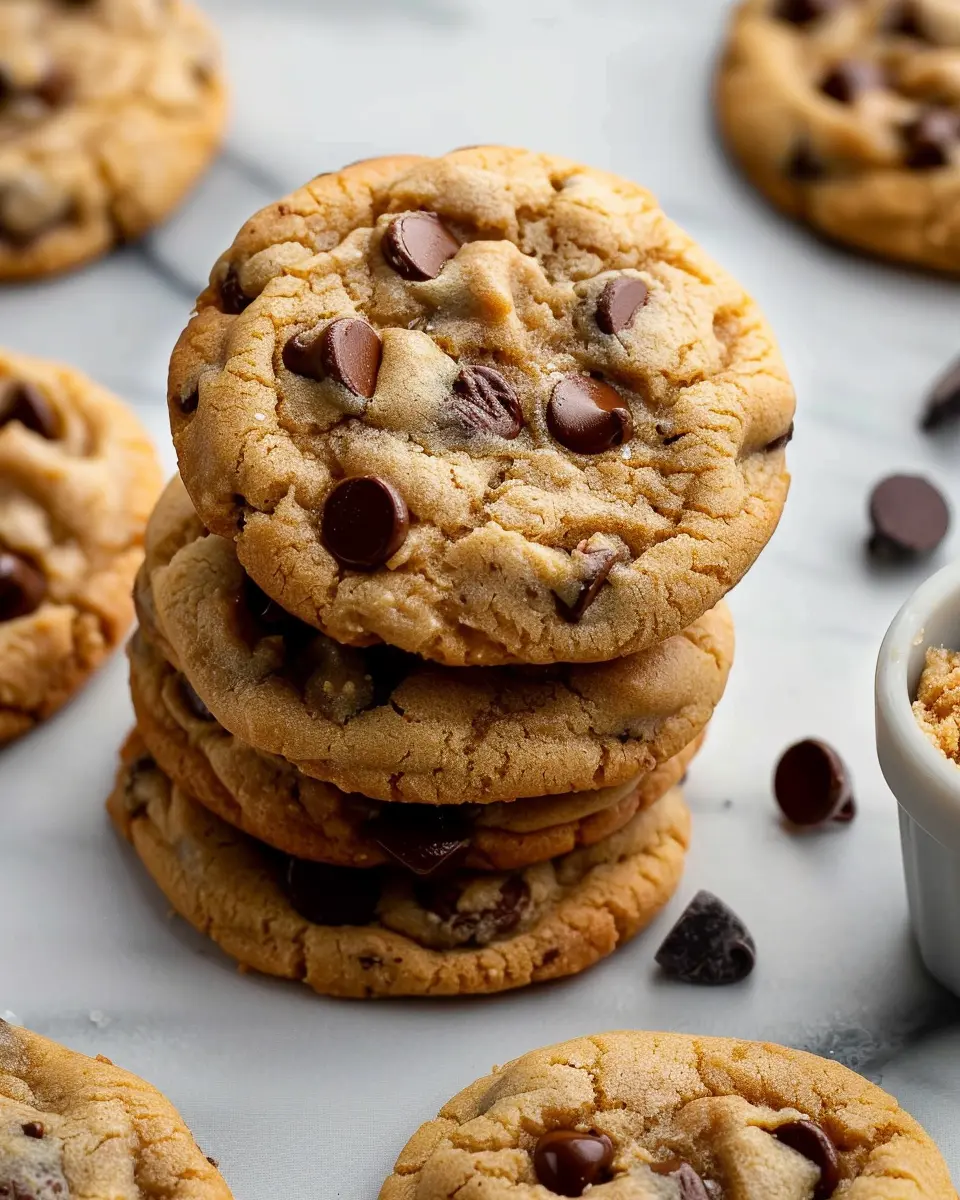
Bake the Cookies
Preheat your oven to 350°F (175°C). While your oven warms up, take the cookie sheets out of the refrigerator. Bake your cookies for 8-10 minutes, or until they are set and just beginning to turn golden on the edges.
Keep an eye on those cookies! Over-baking can lead to tough cookies, which is the last thing you want when the aroma is wafting through your kitchen. Once they’re done, cool the cookies completely on wire racks—this is essential for optimal icing adherence.
Prepare the Icing
Now comes one of the most exciting parts—preparing the icing for your Christmas cookie icing recipe! Here’s a simple royal icing recipe perfect for decorating:
- 4 cups powdered sugar
- 3 egg whites (or 4 tablespoons meringue powder mixed with 6 tablespoons water)
- 1/2 teaspoon lemon juice (optional for flavor)
In a mixing bowl, whip the egg whites until frothy. Gradually add the powdered sugar, mixing until it reaches a spreadable consistency. You can color the icing with food coloring for added effect—think vibrant reds, greens, and yellows.
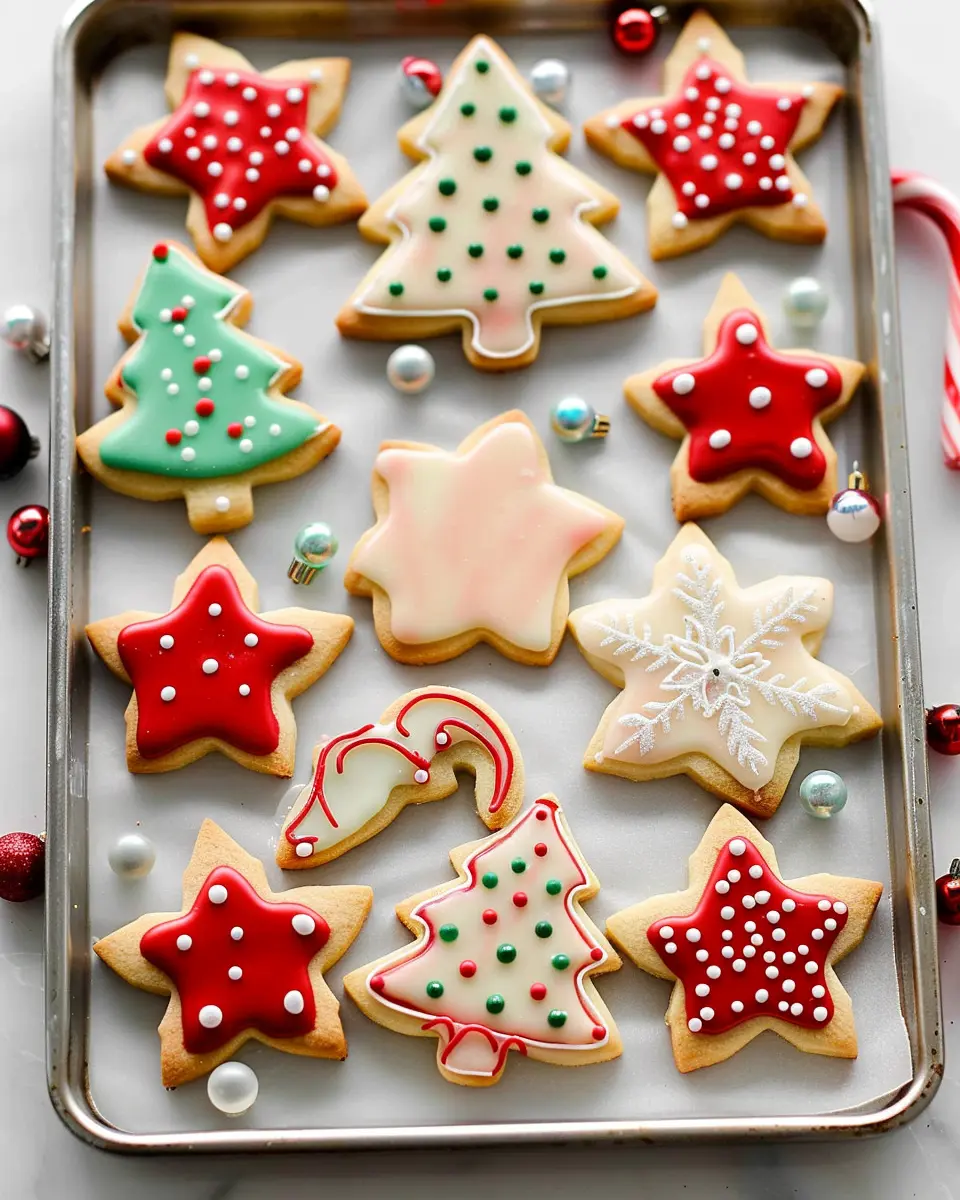
Decorate the Cookies
With your cookies fully cooled and icing ready, it’s time to get creative!
- Use piping bags: You can fill piping bags with icing for detailed decorating work. For flooding the cookies, try a wider tip.
- Let imagination flow: Use sprinkles, edible glitter, or even simple candies to enhance your designs.
As you decorate, think about themes—maybe a winter wonderland or a Christmas forest. Don’t hesitate to channel your inner artist; even imperfect cookies can bring a smile!
And remember, the more cookies you make, the more fun you’ll have sharing them with family and friends. After all, it’s the joy of giving and celebrating together that makes the holiday season truly special!

Variations on Christmas Cookie Icing
Creating the perfect Christmas cookie icing recipe is just the beginning of your festive baking adventures! There are so many ways to personalize your icing. Let’s explore some fun variations that can elevate your cookie decoration game.
Flavored Icing Options
Why stick to plain vanilla when you can add a twist? Consider infusing your icing with delightful flavors. Here are a few ideas to inspire you:
- Cocoa: Mix in cocoa powder for a chocolatey delight.
- Citrus Zest: Orange or lemon zest can brighten up the flavor profile.
- Almond Extract: A splash can add a lovely nutty flavor perfect for holiday cookies.
Feel free to experiment with extracts like peppermint or even anise. Just remember, a little goes a long way!
Colorful Decoration Ideas
Make your cookies a visual feast! You can use gel food coloring to tint your icing. For a more vibrant outcome, try these ideas:
- Swirls: Blend two colors of icing using a toothpick for a marbled effect.
- Sprinkles: No cookie is complete without a sprinkle of festive flair! Choose holiday-themed sprinkles for a seasonal touch.
Consider pairing your colored icing with techniques like piped borders or flooding for varied texture!
Using Different Piping Techniques
Don’t underestimate the potential of your icing. Invest in piping bags and a few decorative tips to bring your cookies to life. Here are some techniques to try:
- Outline and Flood: Outline your cookie shape with thick icing, then fill in with thinner icing to create smooth surfaces.
- Royal Icing: This creates a classic, hard finish that’s perfect for intricate designs. For tips on mastering royal icing, check out this helpful guide.
Each technique adds a unique touch, making your Christmas cookie icing truly one-of-a-kind. Happy decorating!
Baking Tips and Notes for Christmas Cookies
Common pitfalls to avoid
When making cookies, it’s easy to run into some classic mishaps. Firstly, measuring ingredients accurately is crucial—too much flour can lead to tough cookies. Be sure to check out resources like the King Arthur Baking Company for precise measurement tips. Also, don’t overlook your oven temperature; baking should be a joyful experience, not a guessing game. An oven thermometer can help you avoid surprises in texture and doneness.
The importance of chilling
Chilling your dough is a game-changer. Not only does it help prevent cookies from spreading too much during baking, but it also allows the flavors to meld beautifully. Aim to chill for at least one hour; you can even prepare the dough a day in advance. Trust me, your cookies will thank you!
Perfecting cookie shapes
Achieving those perfect shapes is easier than you think! Use cookie cutters or an ice cream scoop for even sizing. If you’re using a Christmas cookie icing recipe, remember that smooth, flat surfaces work best for decorating. Also, consider rolling the dough out between two sheets of parchment paper for a mess-free experience.
With these tips, you’re well on your way to creating delightful, festive cookies for your holiday celebrations!

Serving Suggestions for Christmas Cookies
Creative ways to gift cookies
Transform your beautifully decorated cookies into delightful gifts! Consider assembling a cookie platter adorned with an assortment of festive shapes and colors. Use seasonal containers like mason jars or decorative tins for a charming presentation. You can even add a personalized touch by including a printed card with the Christmas cookie icing recipe for your recipients to try!
Ideal pairings with drinks
Pair your cookies with warm beverages for a cozy treat. Hot cocoa, spiced cider, or even a flavored herbal tea create a wonderful contrast to the sweetness of your cookies. These options not only enhance the flavors but also set a festive mood—perfect for enjoying during holiday gatherings. For a creative twist, try incorporating a cookie into a milkshake or smoothie for an indulgent treat!
Displaying your cookie creations
Displaying your cookies can turn your holiday gatherings into a showcase. Use tiered stands or decorative trays as eye-catching ways to present your cookie collection. Highlight your most colorful creations with varying heights to draw attention. Don’t forget to sprinkle some festive decorations around the display—think pinecones and holly berries. This not only enhances aesthetics but also brings the holiday spirit to your dessert table!
For more festive ideas, check out Taste of Home and AllRecipes for inspiration.
Time Breakdown for Making Christmas Cookies
Preparation time
Getting organized is key! The preparation time for your Christmas cookies is approximately 20-30 minutes. This includes gathering all your ingredients and tools, which can be a great time to enjoy the festive spirit.
Baking time
Once prepped, baking your cookies will take about 10-12 minutes. Keep a close eye on them; the aroma of freshly baked cookies fills the house with holiday cheer, so you won’t want to take your eyes off that oven!
Total time with icing
After baking, add another 30 minutes for cooling and decorating with your Christmas cookie icing recipe. This gives you enough time to let your creativity shine while crafting beautiful, sweet masterpieces that are ready to impress. The entire process will take roughly 1.5 – 2 hours, but the joy you’ll spread is priceless!
For tips on how to create stunning icing designs, check out this detailed guide on cookie decoration.
Nutritional Facts for Christmas Cookies
Estimated calories per cookie
When indulging in our Christmas cookie icing recipe, it’s good to know what you’re treating yourself to! On average, a single iced cookie contains around 100-150 calories. The actual count can vary based on the size of the cookie and thickness of the icing. Keeping portions in check can help you enjoy these sweet treats without going overboard.
Sugar content breakdown
The delightful icing adds sweetness, typically contributing 7-10 grams of sugar per cookie. This means if you’re enjoying a few cookies, it’s easy to go above the recommended daily limit for added sugars. For guidance, the American Heart Association suggests women limit added sugars to about 25 grams per day.
Tips for healthier icing options
If you’re looking to lighten the load, consider these alternatives:
- Use natural sweeteners like honey or maple syrup.
- Experiment with Greek yogurt as a base for a tangy, lower-sugar icing.
- Add flavor with vanilla extract or spices instead of more sugar.
For more recipes that focus on healthy swaps, check out resources like the Mayo Clinic. Enjoy baking and decorating your cookies while keeping them a little healthier this holiday season!
FAQs about Christmas Cookie Icing
What’s the best way to store decorated cookies?
Once your cookies are decorated, it’s essential to store them properly to keep that vibrant icing and delicious flavor intact. Ideally, you should allow the icing to fully set before storing. Place your cookies in an airtight container, separating layers with parchment paper to prevent sticking. Keep them in a cool, dry place, away from direct sunlight. For longer freshness, consider freezing your cookies; they can last up to three months in the freezer! Just make sure to thaw them in the fridge before serving to retain their texture.
For more detailed storage tips, check out extensive guides on sites like The Spruce Eats.
How long does icing take to set?
Typically, it can take anywhere from 1 to 6 hours for your icing to set, depending on its thickness and humidity levels. If you’re using a thicker royal icing, it will require more time to harden. On the other hand, a thinner glaze might be ready in under an hour. Be patient—allowing it to set properly ensures that all your hard work won’t smudge.
Can I use store-bought icing?
Absolutely! If you’re short on time or just prefer convenience, using store-bought icing can be a great option. Look for a frosting that promises to harden, as some varieties remain gooey. Just remember that creating your own Christmas cookie icing recipe can elevate your baking game and customize flavors to your liking. If you want to venture into homemade icing, check out Taste of Home’s guide for some fantastic recipes.
Now that you have answers to those burning questions, you’re ready to dive into your Christmas cookie decoration adventure!
Conclusion on Christmas Cookie Icing
Recap of the Joy of Homemade Cookies
Homemade cookies bring a sense of nostalgia and warmth that few things can match. The aroma of freshly baked cookies fills the air, creating cozy memories and delightful moments with loved ones. Whether it’s during a festive gathering or a quiet evening at home, sharing cookies can spread happiness in an instant.
Encouragement to Experiment with Icing
Don’t hesitate to get creative with your Christmas cookie icing recipe! Try different colors, flavors, and techniques until you find the perfect combination that suits your style. You might discover a new family favorite!
Invitation to Share Experiences
Now it’s your turn! I’d love to hear about your own cookie decorating adventures. What unique touches did you add to your icing this year? Share your experiences in the comments or on social media. Let’s connect and celebrate the joy of baking together!
PrintChristmas cookie icing recipe: Easy tips for festive decorating

Learn how to make the perfect icing for your Christmas cookies with these simple tips and tricks.
- Prep Time: 10 minutes
- Total Time: 10 minutes
- Yield: 2 cups of icing
- Category: Dessert
- Method: Mixing
- Cuisine: American
Ingredients
- 2 cups powdered sugar
- 2 tablespoons milk
- 1 teaspoon vanilla extract
- Food coloring (optional)
Instructions
- In a mixing bowl, combine powdered sugar, milk, and vanilla extract.
- Stir until smooth and the consistency is thick yet pourable.
- If using, add food coloring to achieve your desired hue.
- Decorate your cookies as desired.
Notes
- For a thinner icing, add more milk a little at a time.
- Let the icing dry completely before stacking cookies.
Nutrition
- Serving Size: 1 tablespoon
- Calories: 80
- Sugar: 16g
- Sodium: 5mg
- Fat: 0g
- Saturated Fat: 0g
- Unsaturated Fat: 0g
- Trans Fat: 0g
- Carbohydrates: 20g
- Fiber: 0g
- Protein: 0g
- Cholesterol: 0mg